A Complete Guide on How To Test Your Flame Sensor

What is a Flame Sensor and How Do They Work?
Safety Precautions Before Testing the Flame Sensor
How To Test & Check an Industrial Flame Sensor
When to Replace a Flame Sensor
Bad or Dirty Flame Sensors – Frequently Asked Questions
The flame sensor is a vital safety component in HVAC systems and furnaces, ensuring the safe and efficient operation of gas-burning equipment. Its primary function is to detect the presence of a flame and prevent unintentional gas flow when no flame is present. Without a working flame sensor, unburned gas could accumulate, posing severe risks such as explosions, fires, or hazardous gas leaks.
In addition to safety, flame sensors play a critical role in maintaining system efficiency and reliability. By verifying that the gas ignites properly and consistently, they ensure optimal combustion, reducing energy waste and minimizing fuel costs. A properly functioning flame sensor also helps avoid frequent shutdowns or lockouts, which can occur when the system incorrectly detects a failure to ignite.
In HVAC systems and industrial furnaces, the flame sensor acts as a safeguard that bridges safety and performance, ensuring the system operates smoothly while protecting people, property, and equipment from dangerous malfunctions. Regular maintenance and timely replacement of faulty sensors are essential to uphold both the safety and efficiency of these systems.

Shop Our Industrial Flame Sensors and Scanners
What is a Flame Sensor and How Do They Work?
The flame sensor is crucial for:
- Safety: Prevents gas leaks and potential explosions by shutting off the gas supply if no flame is detected.
- Efficiency: Ensures proper combustion, reducing energy waste and fuel costs.
- System Reliability: Prevents false starts and unnecessary shutdowns by verifying ignition.
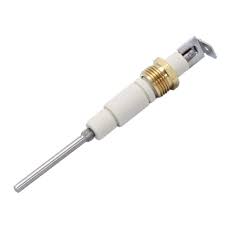
The sensor detects the presence of a flame through ionization. When a flame is present, it creates a small electrical current. The sensor sends this signal to the furnace’s control board to confirm ignition. If a flame is detected, the system continues to supply gas for combustion. If no flame is detected, the sensor triggers the control board to shut off the gas supply, ensuring safety. The flame sensor is typically a metal rod positioned in the burner flame. Over time, it may require cleaning or replacement due to dirt buildup or wear, as a malfunctioning sensor can cause the system to shut down unnecessarily.

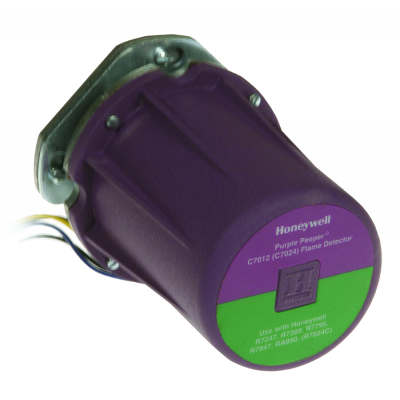
Shop Our Honeywell Purple Peepers
Safety Precautions Before Testing the Flame Sensor
- Turn Off Power to the System
Switch off the furnace or HVAC system at the main power switch or breaker to prevent electrical shock. - Shut Off Gas Supply
Turn off the gas supply to eliminate the risk of gas leaks or accidental ignition during maintenance. - Allow the System to Cool
Wait for the furnace or burner to cool down to avoid burns from hot surfaces. - Wear Proper Safety Gear
Use protective gloves, safety glasses, and appropriate clothing to protect against burns, dirt, and debris. - Verify Power is Off
Use a voltage tester or multimeter to confirm there is no electrical current in the system before handling components. - Ensure Proper Ventilation
Work in a well-ventilated area to avoid exposure to gas fumes or combustion byproducts. - Locate the Flame Sensor
Consult the system’s manual to correctly identify the flame sensor and avoid damaging other components. - Check for Gas Odors
Smell for any gas leaks. If gas is detected, do not proceed—ventilate the area and contact a professional technician. - Use the Correct Tools
Have the appropriate tools ready, such as a screwdriver, multimeter, or socket wrench, to prevent accidental damage. - Secure the Work Area
Keep the area clear of flammable materials and ensure no unauthorized individuals (especially children) are nearby.

Shop Our Industrial and Commercial Flame Safety Devices
How To Test & Check an Industrial Flame Sensor
Step 1: Disabling the Heating System
1. Notify Relevant Personnel
- Inform operators, maintenance staff, and supervisors about the planned shutdown to ensure everyone is aware of the work being performed.
- Follow any lockout/tagout (LOTO) procedures required by the facility.
2. Shut Down the Control System
- Use the system’s HMI (Human Machine Interface) or control panel to shut down the heating system.
- Set the system to manual/off mode to prevent automatic restarts.
3. Isolate Power to the System
- Locate the main power disconnect switch or electrical breaker for the heating system.
- Turn the disconnect switch to the “Off” position and apply a lockout/tagout (LOTO) device to ensure no power can be restored accidentally.
4. Verify Power Isolation
- Use a voltage tester or multimeter to confirm there is no electrical current at the system’s main power terminals.
- Follow the facility’s safety standards for electrical verification (e.g., using a test-before-touch method).
5. Shut Off the Gas Supply
- Locate the industrial gas shutoff valve feeding the heating system.
- Turn the valve to the “Closed” position and secure it if required with a locking device.
6. Vent and Purge the System
- Ensure proper ventilation in the work area to clear any residual gas.
- Follow facility protocols for purging gas lines if necessary to avoid gas buildup.
7. Allow the System to Cool
- Wait for all components, such as burners and chambers, to cool to a safe working temperature.
- Use thermal cameras or non-contact temperature sensors to verify component temperatures if needed.
8. Secure the Work Area
- Place barriers, warning signs, or tape around the work area to prevent unauthorized access.
- Ensure there are no flammable materials, sparks, or ignition sources nearby.
9. Remove Access Panels Safely
- Use the proper tools to unscrew or unlock access panels.
- Be cautious of sharp edges, residual heat, and moving parts.
10. Follow Company Safety Protocols
- Adhere to the facility’s specific procedures for shutdowns, gas handling, and maintenance.
- Keep fire extinguishers and emergency response kits accessible.
Step 2: How To Remove and Locate the Flame Sensor
1. Identify and Inspect the Flame Sensor
- Locate the flame sensor rod mounted near the burner flame path.
- It typically appears as a small metal rod connected to a wire or terminal.
- Inspect for signs of corrosion, dirt buildup, or damage before removal.
2. Safely Disconnect the Flame Sensor
- Unplug the electrical connector or wire leading to the flame sensor.
- Use an insulated screwdriver or wrench to remove the screws/bolts securing the sensor.
- Carefully pull the flame sensor out of its mounting bracket without bending or damaging the rod.
3. Inspect the Mounting Area
- Check for dirt, debris, or damage around the flame sensor mounting point.
- Ensure the area is clean and clear before reinstallation or replacement.
4. Store the Flame Sensor Safely
- If testing or replacing, store the flame sensor in a clean, dry place to avoid contamination or damage.

Shop Our UV Flame Detectors and Sensors
When to Replace a Flame Sensor
- No Flame Detection:
The heating system shuts down repeatedly even when the burner flame is present, indicating the flame sensor is not detecting the flame. - System Lockouts or Frequent Shutdowns:
If the system goes into “lockout” mode (safety shutdown) due to failure to verify the flame, the sensor may be faulty. - Visible Corrosion or Rust:
Signs of rust, pitting, or significant corrosion on the sensor rod indicate it is worn out and needs replacement. - Excessive Carbon Buildup:
If cleaning the flame sensor does not resolve the issue, heavy carbon deposits or oxidation may mean the sensor has degraded. - Physical Damage:
If the sensor rod is bent, cracked, or otherwise physically damaged, it must be replaced. - Erratic Readings:
Use a multimeter to test the flame sensor’s microamp signal. A reading below the manufacturer’s specified range (often 2-6 microamps) suggests a failing sensor. - Repeated Cleaning Required:
If the sensor requires frequent cleaning to function, it may be nearing the end of its life and losing reliability. - Aging Sensor:
Flame sensors typically last 3-5 years under normal conditions. If the sensor is older, preemptive replacement can prevent failures. - Discolored or Worn Insulation:
If the sensor’s wiring or ceramic insulation shows discoloration, cracks, or wear, it indicates aging and possible malfunction.

Shop Our Industrial Automation & Equipment Parts Gallery
Bad or Dirty Flame Sensors – Frequently Asked Questions
- How often should a flame sensor be cleaned?
- Clean the flame sensor once a year, ideally during annual HVAC or furnace maintenance.
- What signs strongly suggest a faulty flame sensor?
- Frequent shutdowns, system lockouts, no flame detection, visible corrosion, carbon buildup, or low microamp readings.
- Can a bad flame sensor affect energy efficiency?
- Yes, a faulty flame sensor can cause frequent shutdowns and inefficient combustion, wasting energy.
- What are the consequences of ignoring flame sensor issues?
- Gas leaks, system lockouts, increased energy costs, potential safety hazards like gas buildup, or furnace failure.
- Tips on choosing the right flame sensor for replacement.
- Check the model number and compatibility with your system. Choose a high-quality sensor from a trusted brand, such as Honeywell or Fireye
