Comprehensive Guide to Repair Kits and Solenoid Coils for Asco Valves
In this guide, we will show you how to replace an Asco Valve solenoid coil and change voltages, how to install an Asco valve repair kit to extend the life of your flow assembly, and how to find out which coil and kit match to your valve body.
ASCO valves are widely recognized for their reliability and precision in controlling the flow of liquids and gases across various industrial applications. Manufactured by Emerson, ASCO offers an extensive range of solenoid valves, pressure-operated valves, and other flow control solutions used in industries such as oil and gas, water treatment, food and beverage, pharmaceutical manufacturing, HVAC, and automation. These valves play a critical role in regulating fluid movement, ensuring operational efficiency and system safety.
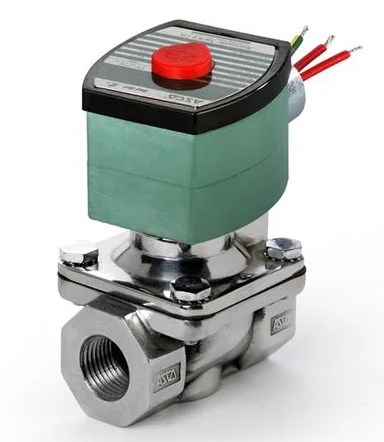
Stainless Steel Asco Solenoid Valve
To maintain peak performance and extend the lifespan of ASCO valves, regular maintenance and timely replacement of components are essential. Key components such as solenoid coils and repair kits are crucial in preventing downtime and avoiding costly system failures. Solenoid coils provide the necessary electrical activation to control valve operation, while repair kits include essential replacement parts like diaphragms, seals, and springs to restore valve functionality.
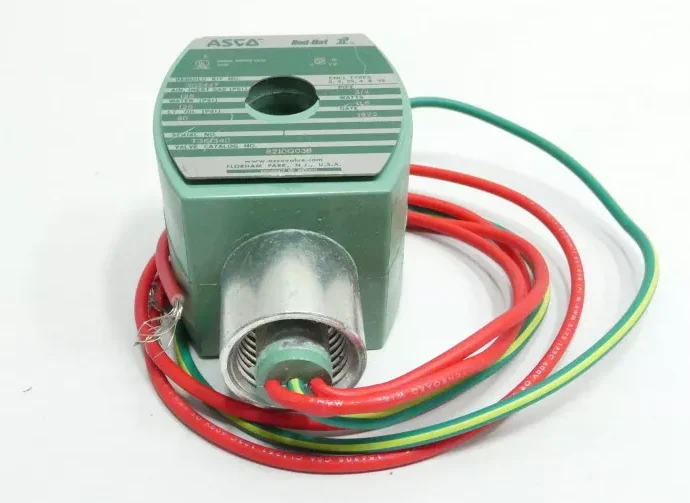
Guide to Asco Solenoid Coils
Encapsulated Coils (Molded Coils)
- Fully encapsulated in thermoplastic or epoxy for protection against moisture, dust, and harsh environments
- Ideal for outdoor and washdown applications.
- Provides enhanced durability and thermal efficiency.
Open Frame Coils
- Consist of bare copper windings without an external protective casing.
- Suitable for controlled indoor environments where exposure to contaminants is minimal.
- Used in low-power applications requiring quick response times.
Explosion-Proof Coils
- Designed for hazardous locations with exposure to flammable gases, vapors, or dust.
- Certified for compliance with ATEX, UL, CSA, and other safety standards.
- Built with heavy-duty enclosures to prevent ignition sources from escaping.
EMC/Low-Power Coils
- Designed to reduce electromagnetic interference (EMI) for use in sensitive applications.
- Consume less power, making them ideal for battery-powered or energy-efficient systems.
- Help improve system reliability in environments with high electronic noise.
Waterproof and Washdown Coils
- Rated IP65 or higher for resistance to water and dust ingress.
- Essential for food processing, beverage production, and pharmaceutical applications.
- Prevents coil failure in high-humidity conditions.
How to Select the Right ASCO Solenoid Coil
Match the Coil Voltage
- Ensure compatibility with the power supply (AC or DC).
- Common voltage ratings: 12VDC, 24VDC, 120VAC, 240VAC.
- Make sure that the solenoid coil matches the optional feature of the valve part number. For example, EF = Explosion Proof Coil, HT = High Temp Coil, and SC = DIN Connection coil. For a full list of valve prefixes and suffixes, please see the Asco Optional Features document here.
Consider Environmental Conditions
- Use explosion-proof coils in hazardous areas.
- Choose waterproof coils for washdown and high-humidity environments.
Check the Valve Compatibility
- Verify that the coil fits the valve’s solenoid stem and housing.
- Match the coil to the required wattage and duty cycle of the valve.
Look for Certifications & Compliance
- Ensure coils meet necessary safety standards (UL, CSA, ATEX, CE) for your industry.
Consider Replacement & Maintenance Needs
- Choose genuine ASCO replacement coils to maintain valve performance and longevity.
- Keep spare coils available to minimize downtime in critical applications.
Sample Valves – Repair Kits – Coil Replacements
| Asco Valve Part Number | Repair Kit | 120 VAC Solenoid Coil |
|---|---|---|
| 8210G100 | 304-355 | 238210-032-D |
| 8344G074 | 302-711 | 238610-032-D |
| 8210G009 | 302-277 | 238210-032-D |
| 8220G007 | 304-394 | 238610-032-D |
| 8221G021 | 310-412 | 272610-032-D |
| 8353G001 | 300-144 | 238610-132-D |
| EF8210G054 | 302-283 | 272614-032-D |
| EF8220G011 | 304-395 | 238614-032-D |
| EF8210G089 | 302-329 | 272614-032-D |
| EF8221G007 | 310-420 | 238214-032-D |
| 8340G002 | 302-752 | 238610-032-D |
| 8210G094 | 302-272 | 238610-032-D |
| 8320G200 | 312-189 | 238610-132-D |
| SC8210G095 | 302-276 | 238612-032 |
| 8316G066 | 314-492 | 238210-032-D |
| 8347A001 | 302-767 | 064982-004-D |
| 8316G076 | 314-492 | 238210-032-D |
| 8214G020 | 316-233 | 238610-132-D |
| 8342G001 | 306-191 | 272610-132-D |
| EF8220G411 | 323-479 | 238814-032-D |
| HT8210G004 | 302-280 | 238410-032-D |

Overview of Asco Repair and Rebuild Kits
hat Are ASCO Repair & Rebuild Kits?
- Pre-packaged sets of replacement parts designed to restore ASCO solenoid valves to optimal working condition.
- Used for preventive maintenance, troubleshooting, and extending valve life.
- Available for various ASCO valve models, ensuring precise fit and compatibility.
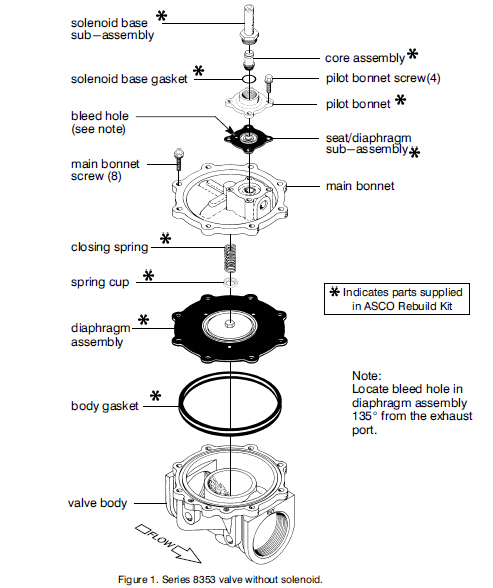
Typical Contents of ASCO Repair & Rebuild Kits
- Diaphragms – Regulate valve opening and closing; prevent leaks and pressure loss.
- Seals & O-rings – Ensure tight sealing and prevent fluid or air leakage.
- Springs – Restore the proper tension for valve operation.
- Plungers & Cores – Control solenoid movement, ensuring proper valve actuation.
- Gaskets – Provide an airtight seal between valve components.
- Solenoid Coil Retaining Clips & Nuts – Secure the coil in place for reliable performance.
Benefits of Using ASCO Repair & Rebuild Kits
- Cost Savings – Avoids the expense of replacing the entire valve assembly.
- Extends Valve Lifespan – Regular maintenance prevents premature wear and failure.
- Ensures Reliable Performance – Keeps valves operating efficiently, reducing downtime.
- Reduces System Downtime – Quick repairs prevent operational disruptions in industrial processes.
- Maintains Compliance & Safety – Ensures valves meet industry regulations and safety standards.
Matching Repair Kits and Coils to Asco Valve Models
Ensuring compatibility between ASCO solenoid valves, repair kits, and solenoid coils is crucial for maintaining optimal performance, safety, and efficiency in industrial applications. Below are key steps to correctly match these components:
Identify the ASCO Valve Model
- Locate the model number on the valve nameplate or label.
- ASCO valve model numbers typically follow formats like 8210G094, 8262H022, or 8316G066.
- If the nameplate is unreadable, check product manuals, past purchase records, or the ASCO website for reference.
Determine the Correct Repair Kit
- ASCO repair kits are designed for specific valve series and sizes.
- Look up the valve’s series number (e.g., 8210, 8320, or 8262) to find the corresponding repair kit.
- Match the kit part number to your valve model in ASCO’s cross-reference guides or supplier catalogs.
- Kits may differ based on:
- Material compatibility (e.g., NBR, EPDM, or Viton diaphragms and seals).
- Pressure and fluid type (air, water, oil, steam, or aggressive chemicals).
- Valve size and function (two-way, three-way, or pilot-operated valves).
Selecting the Right Solenoid Coil
- Match the coil voltage to your system: AC (120V, 240V, 480V) or DC (12V, 24V, 48V, 125V).
- Ensure the coil wattage and power rating align with the valve specifications.
- Consider environmental factors:
- Explosion-proof coils for hazardous locations.
- Washdown coils for food processing or outdoor exposure.
- Low-power coils for energy-efficient or battery-operated systems.
Installation Guide for Repair Kits and Coils
Installing an ASCO Solenoid Coil
-
-
Power Off the System
- Turn off the electrical supply to prevent shocks or coil damage.
- Depressurize the valve by shutting off the fluid or air supply.
-
Remove the Old Solenoid Coil
- Unscrew the Red Hat plastic, nut or retaining clip securing the coil to the valve stem.
- Carefully lift the coil off the valve stem.
-
Inspect the New Coil & Valve Stem
- Ensure the new coil matches the voltage and power rating of the existing system.
- Check for debris, corrosion, or damage on the valve stem and clean if necessary.
-
Install the New Solenoid Coil
- Slide the coil onto the valve stem, ensuring a secure and flush fit.
- Reattach the Red Hat, retaining nut or clip to hold the coil in place.
-
Reconnect the Electrical Wiring
- Follow the correct polarity (especially for DC coils).
- Secure all connections to prevent loose or faulty wiring.
-
Restore Power & Test the Coil
- Turn the power back on and energize the coil to check for proper operation.
- Listen for a clicking sound, indicating successful activation.
-
II. Installing an ASCO Valve Rebuild Kit
-
-
Turn Off the System & Depressurize the Valve
- Shut off all electrical, fluid, and air supply.
- Bleed out residual pressure to prevent injury or valve damage.
-
Disassemble the Valve
- Unscrew bolts or fasteners holding the valve body together. Depending n the valve kit number, there will be various component pieces to replace.
- Remove the top section and solenoid assembly to access internal components.
-
Remove Old Components
- Carefully take out the diaphragm, springs, O-rings, and seals.
- Clean the internal surfaces to remove debris or buildup.
-
Install New Rebuild Kit Components
- Place the new diaphragm, seals, and springs exactly as the originals were installed.
- Ensure all gaskets and O-rings are properly seated.
-
Reassemble the Valve
- Reattach the solenoid assembly and secure the valve body.
- Tighten bolts evenly to prevent leaks or misalignment.
-
Restore the System & Perform a Function Test
- Turn on the fluid supply and electrical power.
- Check for leaks, proper valve opening/closing, and solenoid operation.
- If issues arise, re-check installation and tighten connections as needed.
-
Order Your Parts from Our Industrial Control Manufacturers and Suppliers
Maintenance Tips for Asco Valves
- Regular Inspection – Check for leaks, corrosion, or debris buildup in the valve body and solenoid coil.
- Clean Components – Remove dirt, scale, or contaminants that can affect valve performance.
- Replace Worn Parts – Use genuine ASCO repair kits to replace damaged diaphragms, seals, and springs.
- Check Electrical Connections – Ensure solenoid coils are securely wired and match the correct voltage.
- Lubricate Moving Parts – Apply compatible lubricants to prevent sticking and ensure smooth operation.
- Test Valve Function – Periodically cycle the valve to confirm proper opening and closing.
Asco Valves Complete Guide – Frequently Asked Questions
-
How often should I replace the solenoid coil in my ASCO valve?
- Replace the solenoid coil only when it shows signs of failure, such as burnout, overheating, erratic operation, or loss of magnetism. Regular inspections help detect early signs of wear.
-
Are there universal ASCO repair kits, or do they vary by valve model?
- ASCO repair kits are specific to each valve model and series.
- Kits include valve-specific diaphragms, seals, springs, and O-rings, ensuring a proper fit.
-
What are the signs that my ASCO valve needs a rebuild?
- Slow or failed operation (valve not opening/closing properly).
- Leaks around the valve body or ports.
- Irregular pressure control or fluctuating system performance.
- Visible wear on internal components, such as torn diaphragms or hardened seals.
-
What are the risks of not following the ASCO rebuild kit chart?
- Incorrect parts can lead to poor fit, leaks, and operational failure.
- System inefficiencies, such as improper pressure regulation or increased energy consumption.
- Safety hazards, including potential malfunctions in critical applications like gas or fluid flow control.
- Shorter valve lifespan, increasing downtime and maintenance costs.